Monday, May 30, 2011

Create Windows Server 2008 R2 Core Domain Controller

This is a great article on how to do this from scratch: How to install a Server Core R2 Domain Controller. I did it a little differently.

For me, I'm starting with a copy of my Server Core template which has already been activated and updated. (See previous posting about Copying VMs in Hyper-V.) UPDATE (6/7/2011): If you're building a new domain, use a unique build for your DC, do NOT use a template or copy an existing VM. Avoid my failure. I'm using a fresh Windows Server 2008 R2 Core build setup for remote management. And I'm going to use Core Configurator (http://coreconfig.codeplex.com/) to make things a little easier.

1. Launch Core Configurator: D:\>start_coreconfig.wsf
2. Click "Computer Settings", then "Add or Remove Roles…"
3. Select NetFx3-ServerCore, then click Apply
4. Select all of the following, then click Apply.
  • ActiveDirectory-PowerShell
  • DirectoryServices-DomainController-ServerFoundation
  • DNS-Server-Core-Role
5. If you don't already have these installed, select both, then click Apply.
  • BestPractices-PSH-Cmdlets
  • ServerManager-PSH-Cmdlets

[You have to do NetFx3 first. Don't try to select them all at one time.]

Unfortunately Core Configurator lacks the functionality to create a new domain, so it has to be done manually. If you're adding a DC to an existing domain, it should do the job, but I haven't tried it yet. To create a new domain we need to create an answer file that can be used by dcpromo.

6. Launch notepad on Core and copy or type the following into it:
[DCINSTALL]
InstallDNS=yes
NewDomain=forest
NewDomainDNSName=yourdomain.com
DomainNetBiosName=yourdomain
SiteName=HQ
ReplicaOrNewDomain=domain
ForestLevel=3
DomainLevel=3
DatabasePath="C:\Windows\NTDS"
LogPath="C:\Windows\NTDS"
SYSVOLPath="C:\Windows\SYSVOL"
RebootOnCompletion=yes
SafeModeAdminPassword=Password1
More information on creating the answer file can be found at KB 947034. Edit the line for NewDomainDNSName to specific your domain name, and DomainNetBiosName to the first part of your fully qualified DNS name. Other things that you may need to edit are SiteName, ForestLevel, DomainLevel, and SafeModeAdminPassword. The site name is used for AD Sites and Services. If you leave it out, the default is "Default-First-Site-Name". The levels in my answer file are all set for Windows Server 2008.

[The InstallDNS line didn't do anything for me on Core. So I redid the whole thing, installing the DNS role before running dcpromo. It worked perfectly that way.]

7. Save this file to the root of your C:\ drive and call it dcpromo.txt. Then run the following command:
dcpromo /unattend:C:\dcpromo.txt
After the reboot, your Server Core is now a DC. The domain administrator account inherited the password from the local administrator account. The first thing here that pissed me off is that it made me change the domain administrator account. Security, blah blah blah. And you can't change it back because it violates the password history requirements that Microsoft has setup by default. Screw that.


8. Run the following commands, in order, to reset the domain administrator account using PowerShell.
powershell
import-module ActiveDirectory
Set-ADuser administrator –PasswordNeverExpires $true
Set-ADAccountPassword administrator –Reset
[enter password]
[enter password again]
exit
Biggest reason for me to do this is because I still need to connect to my DC from a machine outside the domain (on my workgroup) now and then. If the domain administrator password matches the administrator password on the workgroup machine, it still allows me to connect via Server Manager and MMC.

Friday, May 27, 2011

Windows Server 2008 R2 Core Workgroup Remote Management

In a previous post I spent a lot of time working out remote management of Windows Server 2008 R2 Core when used in a workgroup instead of a domain. I had gotten MMC working fine for everything that I needed at the time, but it turns out I missed some things (2 that I’ve found so far).

First, if you had tried to use the Device Manager remotely you would have received a nice "Access is denied" error message. This can be resolved by editing a local policy: Computer Configuration\Administrative Templates\System\Device Installation\Allow remote access to the Plug and Play interface. [You have to reboot for the policy to take effect.]

Instructions for this can be found here. But unlike what the article indicates, you do not get the ability to edit devices. Maybe that works in Server 2008, but in Server 2008 R2 you only get read-only access.

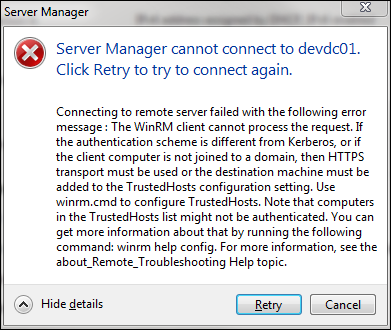
Second, and probably more important, when you try to connect to your Server Core via Server Manager from another machine in the workgroup, you will receive the following error:

Connecting to remote server failed with the following error message: The WinRM client cannot process the request. If the authentication scheme is different from Kerberos, or if the client computer is not joined to a domain, then HTTPS transport must be used or the destination machine must be added to the TrustedHosts configuration setting. Use winrm.cmd to configure TrustedHosts. Note that computers in the TrustedHosts list might not be authenticated. You can get more information about that by running the following command: winrm help config. For more information, see the about_Remote_Troubleshooting Help topic.

The solution to the problem is found in this TechNet article. You can follow the instructions in the Note section which says to run the following command on the source computer. (By "source computer" they mean the computer that you’re using to connect to Server Core.)

winrm set winrm/config/client @{TrustedHosts="ServerCoreMachineName"}

I’m sure that works fine, but I did something different. I read somewhere else about that fact that this setting exists in local policy. Run gpedit.msc, and navigate to Computer Configuration\Administrative Templates\Windows Components\Windows Remote Management\WinRM Client\Trusted Hosts. You can enter multiple hosts using this method, or in my case just allow all hosts.

WinRM Trusted Hosts via Local Policy

And just like that, Server Manager works over a workgroup.

Monday, May 16, 2011

Hyper-V Tools for R2

After searching the internet for hours it seemed clear that setting up a dedicated network in Hyper-V was something that should be possible. I’d read dozens of posts on how dedicated networking was a new feature for Hyper-V R2. So why couldn’t I figure out how to do it?

I eventually found my way to this blog post from John Howard. The article clearly explained the new networking option and included a picture of what the screen should look like. So… why didn’t my screen look like that? Well, if you scroll down and read the comment posted by John on March 25, 2010, you’ll find out.

“That checkbox only exists on the v2 UI present in Windows 7 and/or Windows Server 2008 R2. The v1 (Vista) UI operating against R2 is not supported - you should be using the v2 UI instead.”

Seriously? The Windows Vista Hyper-V client has not been updated to support Hyper-V R2. And based on John’s comment, I’m going to guess that it never will be. Why doesn’t the download page for the Vista Hyper-V tools explicitly state that they are NOT compatible with Hyper-V R2? Where’s the bright red print? WTF! If the guy who wrote that KB article was standing in front of me I’d kick him square in the nuts! Thanks Microsoft. Thanks for wasting hours of my life.

Here’s another article that John wrote, specifically on using the Vista client for R2.

For most people this probably isn’t an issue. Just manage Hyper-V from the Windows Server 2008 R2 box. But when your corporate network runs Vista and the first Windows Server 2008 R2 box you deployed is Windows Server 2008 R2 Core running Hyper-V… where exactly does that leave you? Screwed, that’s where it leaves you.