Thursday, April 7, 2011

Copying VMs in Hyper-V

I’m a programmer. I have plenty of experience building and configuring systems, but I’m not a real systems engineer. As a result, I can, and have, screwed up my share of systems. For the virtual network that I’m building, I need a way to recreate VMs easily when I screw them up.

I already have a base Server Core VM that I have built in Hyper-V. My first inclination is to just make a copy my existing VHD. Then create a new VM and point it to that copied VHD. Let me save you some time - don’t do that.

When you create a VM and attach a copied VHD, something about the Hyper-V settings are just different enough that Windows needs to be reactivated. You may have better luck, but I tried it several times using my Server Core VHD with the same result each time.

This isn’t an issue if you’re perfect and will never need to recreate any of your VMs. Me, I’m likely to go through 15 VMs over the next year. Since, to the best of my knowledge, my MSDN key can only be used to activate a machine 10 times, I’m likely to have an issue.

Solution: use Hyper-V’s export and import functionality. Select the VM in Hyper-V, right click and select "Export..." This will open a dialog box asking you where you want to export the files. Whatever folder that you pick, Hyper-V will create a new folder in the location with the same name as the VM. Once you click Export, Hyper-V will start to copy your VM. In the main Hyper-V window scroll all the way to the right side to see the "Status" column. It will show you the progress of your export.


Once the export has completed, I rename the folder that Hyper-V created to whatever I want my new VM to be named. Then select "Import Virtual Machine..." from the Actions menu on the left side of the Hyper-V window. Browse to the folder you just renamed and select it. Change the Import settings to "Copy the virtual machine". It’s not actually going to copy the VM, but import it as a unique VM.


Once the VM has been imported, you’ll have to rename it in Hyper-V. And I tend to rename my VHDs as well, but that’s a personal preference. Once you finish making all the changes that you need and start the VM, you can run the following command to validate that it’s still activated.

start /w slmgr.vbs -dli

This was all tested with Server Core, but I would expect the same results in full Windows Server.

UPDATE (5/22/2011):  Tested this with the regular version of Windows Server 2008 R2 and it works.

UPDATE (6/7/2011):  Do NOT do this if you're building a domain controller for a new domain. You'll run into this problem.

UPDATE (10/1/2012):  A few months ago I replaced my server with a beefier box. My exported VM template, when imported, was no longer activated. Activation does seem somehow tied to the host. I wanted to figure out how I could have prevented it, but I didn't have the time. So I just reactivated my template moved on.

Wednesday, April 6, 2011

Windows Server 2008 R2 Core Installation

I need to build a small virtual network. Due to limited physical resources, and advice from a Microsoft field rep, I’m using Windows Server 2008 R2 Core wherever I can. My first step was to create a Server Core build and see how many things I could use it for. I’ve had some limited exposure to Server Core at work, enough to know it’s a pain in the ass.

Starting point: Windows Server 2008 R2 Standard running Hyper-V

Created a new external virtual network in Hyper-V, and selected a network adapter to use. My server has two NICs – I chose the NIC labeled #2 since the first one handles all the regular traffic to my server.

Created a new VM, assigning only 512MB of RAM. Installed Windows Server 2008 R2 Core Standard. Set the administrator password. Nothing special up to this point. The new Server Core was by default on the same workgroup as my Hyper-V host server: WORKGROUP.

If you’re not familiar with Server Core, it has no GUI. The only way to interact with it is via the command line. No one really wants to do that, so the next step was to configure the system for remote administration. R2 introduced a new management utility called SCONFIG. More details about that can be found here.

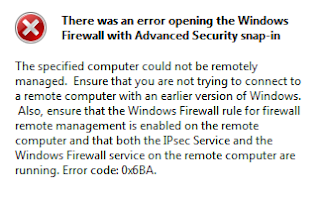
To configure remote management, I followed the steps here. The article has you use SCONFIG entirely. I then went to my Hyper-V host server, fired up MMC, added the Firewall snap-in (I couldn’t tell you why I chose the Firewall snap-in), and pointed it to my new Server Core install. It didn’t work. Here’s what I got:

There was an error opening the Windows Firewall with Advanced Security snap-in  The specified computer could not be remotely managed. Ensure that you are not trying to connect to a remote computer with an earlier version of Windows. Also, ensure that the Windows Firewall rule for firewall remote management is enabled on the remote computer and that both the IPsec Service and the Windows Firewall service on the remote computer are running. Error code: 0x6BA.

This was followed by lots of Googling. I followed the steps here. I manually set the firewall to allow for remote administration and enabled remote management of IPSec. Still couldn’t connect to the server from MMC.

At this point I’m pissed.  Everything I’ve read said this should work. I was getting a generic error (0x6BA was positively useless) and finding nothing helpful online. I started testing connectivity between machines and decided that the firewall had to be the problem. I needed to isolate whether it was the Hyper-V host firewall or the Server Core firewall.

Disable the Firewall on Server Core
netsh advfirewall set allprofiles state off
(change off to on to turn the firewall back on)

Suddenly MMC could connect to Server Core and I could remotely manage the firewall. Only problem was that I couldn’t see anything wrong in the firewall settings. Remote Administration rules were all turned on, as were the Windows Firewall Remote Management rules. I don’t want to leave the firewall off, so I kept Googling.

At some point I found an article or blog post [link to which I can’t find again] that indicated this was a problem because I wasn’t using a domain, but a workgroup. If my computers were joined to a domain, everything would be working fine. Fantastic.

With the firewall disabled I was able to access the file system remotely via \\computername\c$. I downloaded Windows Server 2008 SP1 and installed it. Turned the firewall back on and tested. Failure.

Then I found Core Configurator. I figured it couldn’t hurt to try it, so I downloaded it and ran it on my Server Core. From the main screen I went to Control panel settings, then to Firewall setting, then to Rule configuration.


In everything that I had done, I had apparently enabled rules for everything except Ping Replies and File And Printer Sharing Management. Enabled both settings and hit apply. Tested… success! WTF?!?

After going back and turning them both off and then on again individually, it was the File And Printer Sharing Management setting that was suddenly allowing me to remotely manage my server with MMC. I don’t know specifically which firewall rule that setting is turning on that is allowing everything to work, but at this point I don’t care.

Clearly Microsoft doesn’t really support workgroups anymore.

Note: The account that I am logged in to on my Hyper-V host machine and my VM have the same name and password. That is the only way this works. If your accounts are different then you will get permissions errors from MMC. Windows Workgroups basics...