Friday, June 17, 2011

Install SQL 2008 R2 on Windows Server 2008 R2 Core

Is it possible? Yes. Is it supported? No.

The Hardware and Software Requirements for Installing SQL Server 2008 R2 from Microsoft clearly state that, "SQL Server 2008 R2 is not supported on Windows Server 2008 SP2 Server Core or Windows Server 2008 R2 Server Core installations."

To be clear, this post just covers the installation of the Database Engine Services. Perhaps if I get bored in the future, I'll try Analysis Services or Reporting Services. Reporting Services I'm pretty sure will be more complicated as it requires IIS.

So let's get started. To begin with you need to ensure the list of roles below are installed. If you're using Core Configurator (and I think you should be), some of these roles will already be installed. From the Core Configurator menu, select "Computer settings…" and then "Add or Remove Roles…"
  • MicrosoftWindowsPowershell [is installed by Configurator]
  • NetFx2-ServerCore [is installed by Configurator]
  • NetFx2-ServerCore-WOW64
  • NetFx3-ServerCore
  • NetFx3-ServerCore-WOW64
  • ServerCore-WOW64 [should be installed by default]
Prior to the running the installer, you need to determine how many service accounts you need, and create them if necessary. Recommended practice is to use a separate service account for each service, but you can certainly get away with running all the services under the same account. I'm going use separate accounts for each service, which means I need two accounts. One for the SQL engine, and one for the SQL agent. Create the accounts you need in Active Directory.


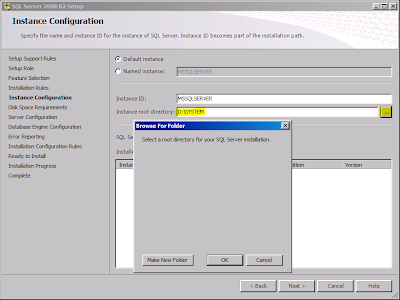
With all the prerequisites out of the way, the SQL install is pretty straight forward. You can actually run the setup program from the CD – no need to do a command line install. There is one issue to be aware of - all of the dialog boxes where you would normally browse to select a folder... they don't work. Instead you'll have to just manually type the path you want to use.


After the installation is finished, the last step is to add a new rule to the firewall to allow communication to the SQL engine.  Easiest way to do this, and validate that it was done correctly, is to use Server Manager or MMC with the Windows Firewall snap-in from another machine.
  • Connect to your SQL server
  • Expand Windows Firewall with Advanced Security (under Configuration in Server Manager)
  • Select Inbound Rules
  • Click New Rule...
  • Select Port, Next
  • Enter Specific local ports: 1433, Next
  • Next
  • Uncheck Private and Public (but really it's up to you), Next
  • Enter Name: SQL Server Engine, Finish
With that finished, you can now use Microsoft SQL Server Management Studio from another computer to connect to your SQL server running on Server Core!


Additional port information can be found in this Technet article. I'm not going to run through and test all the different installation options on Server Core, but should you deviate from defaults, that article should help you identify what other ports need to be opened.

Tuesday, June 7, 2011

DC with Copied VM in Hyper-V, Fail

I previously built a domain controller using a copy of a Windows Server 2008 R2 Core template that I had already setup. Everything worked fine until I built another server using the same template and joined it to the domain. Then I ran into this:

Event 5516 The computer or domain [machine] trusts domain [domain]. (This may be an indirect trust.) However, [machine] and [domain] have the same machine security identifier (SID). NT should be re-installed on either [machine] or [domain].

Bottom line here is that you do not ever want to copy/clone/duplicate a server to build a new domain. Your domain controller for your new domain needs to be a unique build, so that it has a unique machine SID. Based on this article, you can feel free to copy/clone/duplicate servers for all other scenarios. It is my understanding that you can even do this when adding a new domain controller to an existing domain - because the new DC will inherit the SID from the domain. This issue only occurs with duplicating a server to build a DC for a new domain.

Now I have to go fix a couple VMs...

Monday, May 30, 2011

Create Windows Server 2008 R2 Core Domain Controller

This is a great article on how to do this from scratch: How to install a Server Core R2 Domain Controller. I did it a little differently.

For me, I'm starting with a copy of my Server Core template which has already been activated and updated. (See previous posting about Copying VMs in Hyper-V.) UPDATE (6/7/2011): If you're building a new domain, use a unique build for your DC, do NOT use a template or copy an existing VM. Avoid my failure. I'm using a fresh Windows Server 2008 R2 Core build setup for remote management. And I'm going to use Core Configurator (http://coreconfig.codeplex.com/) to make things a little easier.

1. Launch Core Configurator: D:\>start_coreconfig.wsf
2. Click "Computer Settings", then "Add or Remove Roles…"
3. Select NetFx3-ServerCore, then click Apply
4. Select all of the following, then click Apply.
  • ActiveDirectory-PowerShell
  • DirectoryServices-DomainController-ServerFoundation
  • DNS-Server-Core-Role
5. If you don't already have these installed, select both, then click Apply.
  • BestPractices-PSH-Cmdlets
  • ServerManager-PSH-Cmdlets

[You have to do NetFx3 first. Don't try to select them all at one time.]

Unfortunately Core Configurator lacks the functionality to create a new domain, so it has to be done manually. If you're adding a DC to an existing domain, it should do the job, but I haven't tried it yet. To create a new domain we need to create an answer file that can be used by dcpromo.

6. Launch notepad on Core and copy or type the following into it:
[DCINSTALL]
InstallDNS=yes
NewDomain=forest
NewDomainDNSName=yourdomain.com
DomainNetBiosName=yourdomain
SiteName=HQ
ReplicaOrNewDomain=domain
ForestLevel=3
DomainLevel=3
DatabasePath="C:\Windows\NTDS"
LogPath="C:\Windows\NTDS"
SYSVOLPath="C:\Windows\SYSVOL"
RebootOnCompletion=yes
SafeModeAdminPassword=Password1
More information on creating the answer file can be found at KB 947034. Edit the line for NewDomainDNSName to specific your domain name, and DomainNetBiosName to the first part of your fully qualified DNS name. Other things that you may need to edit are SiteName, ForestLevel, DomainLevel, and SafeModeAdminPassword. The site name is used for AD Sites and Services. If you leave it out, the default is "Default-First-Site-Name". The levels in my answer file are all set for Windows Server 2008.

[The InstallDNS line didn't do anything for me on Core. So I redid the whole thing, installing the DNS role before running dcpromo. It worked perfectly that way.]

7. Save this file to the root of your C:\ drive and call it dcpromo.txt. Then run the following command:
dcpromo /unattend:C:\dcpromo.txt
After the reboot, your Server Core is now a DC. The domain administrator account inherited the password from the local administrator account. The first thing here that pissed me off is that it made me change the domain administrator account. Security, blah blah blah. And you can't change it back because it violates the password history requirements that Microsoft has setup by default. Screw that.


8. Run the following commands, in order, to reset the domain administrator account using PowerShell.
powershell
import-module ActiveDirectory
Set-ADuser administrator –PasswordNeverExpires $true
Set-ADAccountPassword administrator –Reset
[enter password]
[enter password again]
exit
Biggest reason for me to do this is because I still need to connect to my DC from a machine outside the domain (on my workgroup) now and then. If the domain administrator password matches the administrator password on the workgroup machine, it still allows me to connect via Server Manager and MMC.

Friday, May 27, 2011

Windows Server 2008 R2 Core Workgroup Remote Management

In a previous post I spent a lot of time working out remote management of Windows Server 2008 R2 Core when used in a workgroup instead of a domain. I had gotten MMC working fine for everything that I needed at the time, but it turns out I missed some things (2 that I’ve found so far).

First, if you had tried to use the Device Manager remotely you would have received a nice "Access is denied" error message. This can be resolved by editing a local policy: Computer Configuration\Administrative Templates\System\Device Installation\Allow remote access to the Plug and Play interface. [You have to reboot for the policy to take effect.]

Instructions for this can be found here. But unlike what the article indicates, you do not get the ability to edit devices. Maybe that works in Server 2008, but in Server 2008 R2 you only get read-only access.

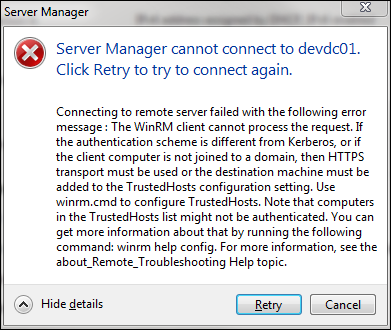
Second, and probably more important, when you try to connect to your Server Core via Server Manager from another machine in the workgroup, you will receive the following error:

Connecting to remote server failed with the following error message: The WinRM client cannot process the request. If the authentication scheme is different from Kerberos, or if the client computer is not joined to a domain, then HTTPS transport must be used or the destination machine must be added to the TrustedHosts configuration setting. Use winrm.cmd to configure TrustedHosts. Note that computers in the TrustedHosts list might not be authenticated. You can get more information about that by running the following command: winrm help config. For more information, see the about_Remote_Troubleshooting Help topic.

The solution to the problem is found in this TechNet article. You can follow the instructions in the Note section which says to run the following command on the source computer. (By "source computer" they mean the computer that you’re using to connect to Server Core.)

winrm set winrm/config/client @{TrustedHosts="ServerCoreMachineName"}

I’m sure that works fine, but I did something different. I read somewhere else about that fact that this setting exists in local policy. Run gpedit.msc, and navigate to Computer Configuration\Administrative Templates\Windows Components\Windows Remote Management\WinRM Client\Trusted Hosts. You can enter multiple hosts using this method, or in my case just allow all hosts.

WinRM Trusted Hosts via Local Policy

And just like that, Server Manager works over a workgroup.

Monday, May 16, 2011

Hyper-V Tools for R2

After searching the internet for hours it seemed clear that setting up a dedicated network in Hyper-V was something that should be possible. I’d read dozens of posts on how dedicated networking was a new feature for Hyper-V R2. So why couldn’t I figure out how to do it?

I eventually found my way to this blog post from John Howard. The article clearly explained the new networking option and included a picture of what the screen should look like. So… why didn’t my screen look like that? Well, if you scroll down and read the comment posted by John on March 25, 2010, you’ll find out.

“That checkbox only exists on the v2 UI present in Windows 7 and/or Windows Server 2008 R2. The v1 (Vista) UI operating against R2 is not supported - you should be using the v2 UI instead.”

Seriously? The Windows Vista Hyper-V client has not been updated to support Hyper-V R2. And based on John’s comment, I’m going to guess that it never will be. Why doesn’t the download page for the Vista Hyper-V tools explicitly state that they are NOT compatible with Hyper-V R2? Where’s the bright red print? WTF! If the guy who wrote that KB article was standing in front of me I’d kick him square in the nuts! Thanks Microsoft. Thanks for wasting hours of my life.

Here’s another article that John wrote, specifically on using the Vista client for R2.

For most people this probably isn’t an issue. Just manage Hyper-V from the Windows Server 2008 R2 box. But when your corporate network runs Vista and the first Windows Server 2008 R2 box you deployed is Windows Server 2008 R2 Core running Hyper-V… where exactly does that leave you? Screwed, that’s where it leaves you.

Thursday, April 7, 2011

Copying VMs in Hyper-V

I’m a programmer. I have plenty of experience building and configuring systems, but I’m not a real systems engineer. As a result, I can, and have, screwed up my share of systems. For the virtual network that I’m building, I need a way to recreate VMs easily when I screw them up.

I already have a base Server Core VM that I have built in Hyper-V. My first inclination is to just make a copy my existing VHD. Then create a new VM and point it to that copied VHD. Let me save you some time - don’t do that.

When you create a VM and attach a copied VHD, something about the Hyper-V settings are just different enough that Windows needs to be reactivated. You may have better luck, but I tried it several times using my Server Core VHD with the same result each time.

This isn’t an issue if you’re perfect and will never need to recreate any of your VMs. Me, I’m likely to go through 15 VMs over the next year. Since, to the best of my knowledge, my MSDN key can only be used to activate a machine 10 times, I’m likely to have an issue.

Solution: use Hyper-V’s export and import functionality. Select the VM in Hyper-V, right click and select "Export..." This will open a dialog box asking you where you want to export the files. Whatever folder that you pick, Hyper-V will create a new folder in the location with the same name as the VM. Once you click Export, Hyper-V will start to copy your VM. In the main Hyper-V window scroll all the way to the right side to see the "Status" column. It will show you the progress of your export.


Once the export has completed, I rename the folder that Hyper-V created to whatever I want my new VM to be named. Then select "Import Virtual Machine..." from the Actions menu on the left side of the Hyper-V window. Browse to the folder you just renamed and select it. Change the Import settings to "Copy the virtual machine". It’s not actually going to copy the VM, but import it as a unique VM.


Once the VM has been imported, you’ll have to rename it in Hyper-V. And I tend to rename my VHDs as well, but that’s a personal preference. Once you finish making all the changes that you need and start the VM, you can run the following command to validate that it’s still activated.

start /w slmgr.vbs -dli

This was all tested with Server Core, but I would expect the same results in full Windows Server.

UPDATE (5/22/2011):  Tested this with the regular version of Windows Server 2008 R2 and it works.

UPDATE (6/7/2011):  Do NOT do this if you're building a domain controller for a new domain. You'll run into this problem.

UPDATE (10/1/2012):  A few months ago I replaced my server with a beefier box. My exported VM template, when imported, was no longer activated. Activation does seem somehow tied to the host. I wanted to figure out how I could have prevented it, but I didn't have the time. So I just reactivated my template moved on.

Wednesday, April 6, 2011

Windows Server 2008 R2 Core Installation

I need to build a small virtual network. Due to limited physical resources, and advice from a Microsoft field rep, I’m using Windows Server 2008 R2 Core wherever I can. My first step was to create a Server Core build and see how many things I could use it for. I’ve had some limited exposure to Server Core at work, enough to know it’s a pain in the ass.

Starting point: Windows Server 2008 R2 Standard running Hyper-V

Created a new external virtual network in Hyper-V, and selected a network adapter to use. My server has two NICs – I chose the NIC labeled #2 since the first one handles all the regular traffic to my server.

Created a new VM, assigning only 512MB of RAM. Installed Windows Server 2008 R2 Core Standard. Set the administrator password. Nothing special up to this point. The new Server Core was by default on the same workgroup as my Hyper-V host server: WORKGROUP.

If you’re not familiar with Server Core, it has no GUI. The only way to interact with it is via the command line. No one really wants to do that, so the next step was to configure the system for remote administration. R2 introduced a new management utility called SCONFIG. More details about that can be found here.

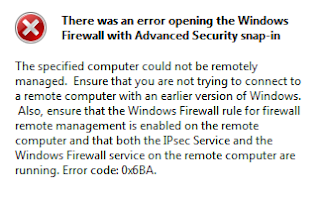
To configure remote management, I followed the steps here. The article has you use SCONFIG entirely. I then went to my Hyper-V host server, fired up MMC, added the Firewall snap-in (I couldn’t tell you why I chose the Firewall snap-in), and pointed it to my new Server Core install. It didn’t work. Here’s what I got:

There was an error opening the Windows Firewall with Advanced Security snap-in  The specified computer could not be remotely managed. Ensure that you are not trying to connect to a remote computer with an earlier version of Windows. Also, ensure that the Windows Firewall rule for firewall remote management is enabled on the remote computer and that both the IPsec Service and the Windows Firewall service on the remote computer are running. Error code: 0x6BA.

This was followed by lots of Googling. I followed the steps here. I manually set the firewall to allow for remote administration and enabled remote management of IPSec. Still couldn’t connect to the server from MMC.

At this point I’m pissed.  Everything I’ve read said this should work. I was getting a generic error (0x6BA was positively useless) and finding nothing helpful online. I started testing connectivity between machines and decided that the firewall had to be the problem. I needed to isolate whether it was the Hyper-V host firewall or the Server Core firewall.

Disable the Firewall on Server Core
netsh advfirewall set allprofiles state off
(change off to on to turn the firewall back on)

Suddenly MMC could connect to Server Core and I could remotely manage the firewall. Only problem was that I couldn’t see anything wrong in the firewall settings. Remote Administration rules were all turned on, as were the Windows Firewall Remote Management rules. I don’t want to leave the firewall off, so I kept Googling.

At some point I found an article or blog post [link to which I can’t find again] that indicated this was a problem because I wasn’t using a domain, but a workgroup. If my computers were joined to a domain, everything would be working fine. Fantastic.

With the firewall disabled I was able to access the file system remotely via \\computername\c$. I downloaded Windows Server 2008 SP1 and installed it. Turned the firewall back on and tested. Failure.

Then I found Core Configurator. I figured it couldn’t hurt to try it, so I downloaded it and ran it on my Server Core. From the main screen I went to Control panel settings, then to Firewall setting, then to Rule configuration.


In everything that I had done, I had apparently enabled rules for everything except Ping Replies and File And Printer Sharing Management. Enabled both settings and hit apply. Tested… success! WTF?!?

After going back and turning them both off and then on again individually, it was the File And Printer Sharing Management setting that was suddenly allowing me to remotely manage my server with MMC. I don’t know specifically which firewall rule that setting is turning on that is allowing everything to work, but at this point I don’t care.

Clearly Microsoft doesn’t really support workgroups anymore.

Note: The account that I am logged in to on my Hyper-V host machine and my VM have the same name and password. That is the only way this works. If your accounts are different then you will get permissions errors from MMC. Windows Workgroups basics...